Aside from an interest in the sonic potential of coil springs, I began with no preconceived idea of how the Springboard should sound or look. Initially, I did not aim to make a musical instrument. I knew springs had been used in early artificial reverb effects, and I was simply intrigued by the sounds of retracting springs for screen doors and garage doors, and I was intent on using readily available materials.
 What developed is a device that amplifies a variety of readily available objects and materials. The Springboard not only generates a wide range of sounds, it has become an extremely flexible and unique instrument.
The following text and photos describe the Springboard's construction and how I use it to produce its various and extraordinary sounds.
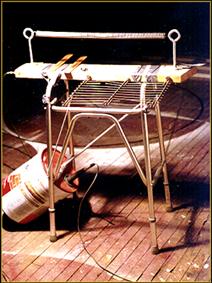
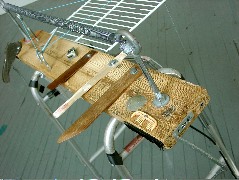
 Attached across the top of an aluminum walker is a 2" x 6" board. A single piezo disk contact microphone is mounted inside a small cavity in the underside of board. By extension, the high sensitivity of the piezo pickup enables the entire board amplify anything attached, hence it is transformed into a receiving surface for amplification of any number of vibrating objects.. Among them are:
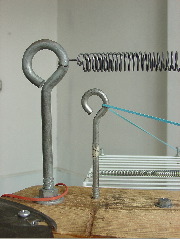
- coil springs of various sizes
- combs
- tuned wood slats (ala Hans Reichel's Daxophone)
- small metal grill
- large rubber bands
... all of which are bowed, plucked, rubbed or struck with brushes, chopsticks, friction mallets, or my bare fingers. With higher amplification the entire instrument is sensitive enough to pick up sounds of the room itself. I also amplify objects placed directly on it, such as a music box mechanism, large rubber bands, a vibrating massager, and a small piezo disk speaker connected to the earphone jack of a pocket radio.
 Coil springs produce a lot of enharmonic content, especially when bowed. In other words, instead of a single clearly pitched tone it produces a group or agglomeration of pitches that are not harmonically related, such as a bell. (Some listeners may note its "cold" or "haunting" tone. Others will associate it with "industrial" sounds. These interpretations are subjective, and to some degree learned through Hollywood's conventional use of such sound in film music and sound design, especially in the "Horror" and "Suspense" genres.)
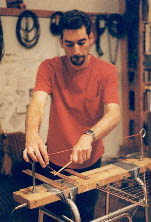
Several coil springs are used on the Springboard. I have one spring attached to each leg of the walker with the other end of each coil spring attached to different points on the board. Usually I bow the springs, as well as the wooden slats. If you have not heard Hans Reichel's Daxophone, I urge you to listen. You might associate the surprising sounds of the bowed wooden slats with murmuring, whining, cajoling, snoring, and growling voices or animal sounds. They can be comic and disturbing. With my crude daxophones I bend the pitch by applying pressure with the fingers of my non-bowing hand. The sonic results work well with saxophone players and the extended vocal techniques of my friend and musical partner, Carol Genetti.
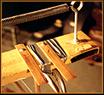
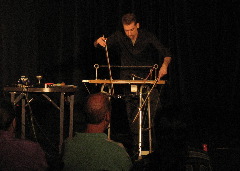
My techniques for playing the Springboard continue to develop through practice. As a drummer I learned how to become sensitive to the material response of the Springboard. I seldom ever hit any parts of the instrument as one hits a drum. Instead, bows, brushes, friction mallets, chopsticks, my bare hands and fingers apply controlled pressure, flexion, and friction to produce its most intriguing sounds. As I mentioned, I prefer using a cello bow on coil springs rather than a plucking or striking them. As with a stringed instrument, bowing produces a harmonically richer tone than plucking a string. The same applies for bowed coil springs.
With large rubber bands stretched around the eyebolts and grill, I make sounds that are identical in range and timbre to an acoustic bass. I pluck them or use chopsticks to drum on them.
In 1999 I began using an Oberheim Echoplex Digital Pro to sample, loop, and overdub sounds in real-time for my performances, both solo and with the Plasticene theater company. However, in free improvised ensemble performances I prefer to use the Springboard without the Echoplex. In these situations the musical flow will shift, halt, or reverse directions faster than I can respond to them with the Echoplex .
A key inspiration for making my own instruments came from Hal Rammel, who began teaching instrument invention workshops at the Experimental Sound Studio in 1990. I had also seen and heard Nicolas Collins and Elliott Sharp perform on invented instruments of varying complexity, in concerts co-sponsored by ESS and Randolph Street Gallery in the late-80s. And prior to that I attended percussion recitals as an art student at Northern Illinois University, where it wasn't unusual to see musicians playing hubcaps, bowls, and other everyday non-musical items.
Prior the invention of the Springboard I had been using drums, an analog synthesizer, a 4-track cassette recorder, reel-to-reel tapes, prepared bass guitar, MIDI controlled samplers, drum machine, computer sequencing, turntables, and environmental (or concrete) sounds as my instruments and/or materials. In the studio I would connect these devices in somewhat complex routing schemes to create recorded pieces. In that environment I was able to use my studio as an instrument itself. I still use some of these devices and techniques in my teaching as well as performances and studio compositions.
Placement, mounting and installation tips
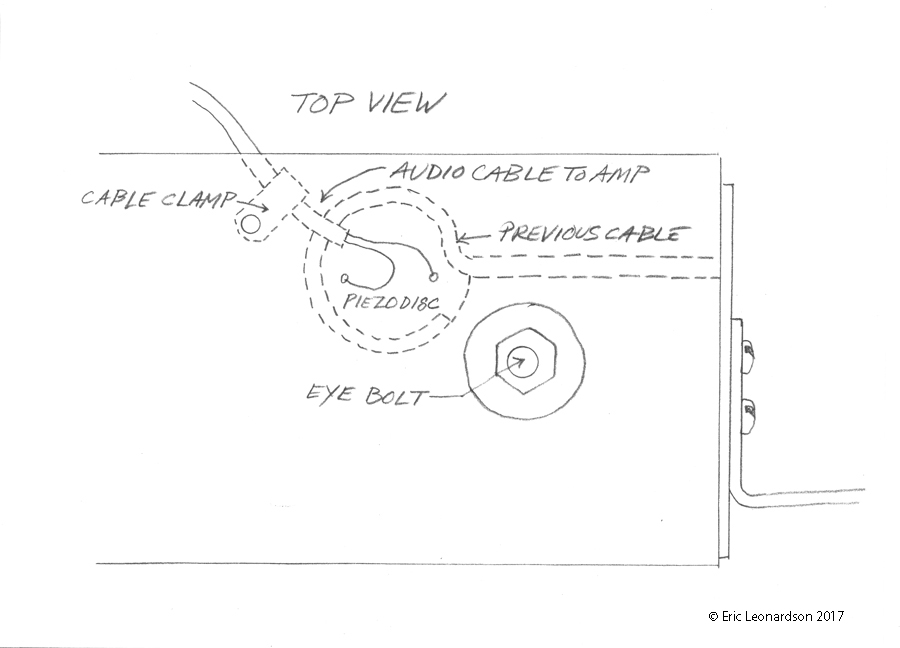
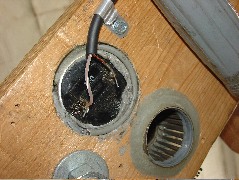
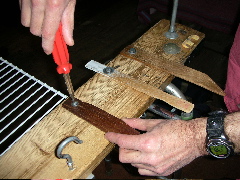
Where you place and mount the piezo will make some difference in determining sound quality. When designing a new experimental instruments my general rule of thumb is to place it in a place located near the source of the vibration. However, with the Springboard vibrations are conducted into the board from many locations. In this case, one cannot get far by obsessing about the "perfect" point. I do like having the pickup embedded in the board, away from anyplace where it may be directly struck while playing—producing an extremely loud sound relative to the others. This means the pickup is permanently mounted after many exploratory listening tests to find what sounds best. I also take care to avoid placing it where it could be damaged accidentally while playing, setting up and striking, packing and transit, including on the road, in flight luggage, etc.
Important notes about piezo electric contact microphones
A final, important technical note about piezo electric contact microphones concerns impedance. This is essential for getting a good sound especially in the lower frequency range. Piezo electric elements are ultra-high impedance devices. Measured in Ohms signified by the omega symbol Ω, or the letter “Z”, microphones and instruments are either “high Z” or “low Z”. The inputs and outputs of mixers and amplifier have their particular impedances. If there is a mismatch between the inputs and outputs, for example, plugging a bass guitar into a mic input can result in a "thin" or "quacky" sound quality. The impedance mismatch typically results in a loss of low frequencies.
To fix this, a preamp is necessary. An EQ to boost the bass is not optimal because this can diminish the middle and upper frequencies needed in upper harmonics when needed. I recommend visiting the K&K Pickups 101 FAQ page with audio examples to understand impedance matching.
Commercially manufactured preamps especially made for piezo pickups. In fact, I use the earlier version of one the K & K models. Though they are bit pricey, mine works wonderfully for the Springboard. When traveling to perform I can rest assured that my instrument will sound as good as it can as long as the venue's electrical and PA system are not faulty.
If you are comfortable with electronics, a DIY preamp can be a significant improvement. Try Richard Lerman’s schematics or the similar circuit in Nicolas Collins’s Handmade Electronic Music: The Art of Hardware Hacking.
Zack Poff's phantom-powered piezo preamp circuit designed by Alex Rice, with PCB layout for balanced output may also be useful.
Along with the preamp, it is wise to avoid long cable runs with piezo pickups, as that can increase impedance too. Bart Hopkin's book, Getting A Bigger Sound mentions this advice. I recommend his book as it is offers many more useful ideas and resources on making and using piezo and other kinds of pickups.
Send me a message when you have made your own, please and ... Enjoy!
Back to page 1
This page was updated on May 27, 2018.